
5 Ways to Preserve Your Harvest
Your hard work is finally paying off. Your tomatoes are brilliantly colorful, your carrot tops are full and leafy, and you should be proud. But when it all comes at once, you're left with one big question: How am I going to eat all of this? Don't fear- your harvest won't go to waste! There are tons of different ways that you can stop the clock on food decay and set yourself up with delicious dishes for months to come. We're sharing 5 simple preservation methods that will help you handle your harvest when you have your hands full.
These preservation methods may seem like they might be complicated, but they are easier than they sound and can be done with ease in your own kitchen. With the exception of a couple of household ingredients that you may need to visit the grocery store for, there is very little you need to accomplish these techniques.
1. Drying Herbs
Using up your fresh herbs can be difficult, especially with very prolific plants like dill, rosemary, and oregano. You can dry them instead of letting them wilt away, thus supplying your spice shelf for the rest of the season.
There are two main ways of drying herbs:
- Air Drying
- Oven Drying
Generally speaking you can make either of these methods work for your herbs, but some herbs are better suited for one method than the other. Air-drying works best for low-moisture herbs like oregano, rosemary, lavender and dill. Herbs like basil, chives and mint contain more moisture and it’s best to dry them in an oven.
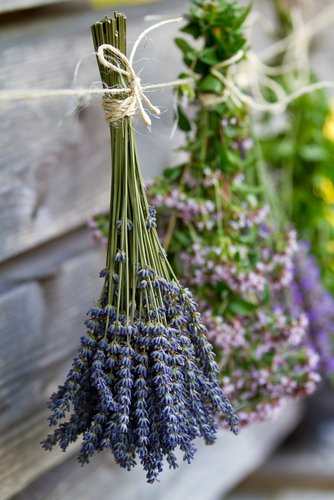
Air Drying
1. Tie together 5-10 branches with string.
2. Put the bundle of herbs in a paper bag (stem side up). Tie the bag closed and poke a few holes in the bag.
3. Hang the bag in a warm, well-ventilated room.
4. Gather the dried herbs in as little as one week.
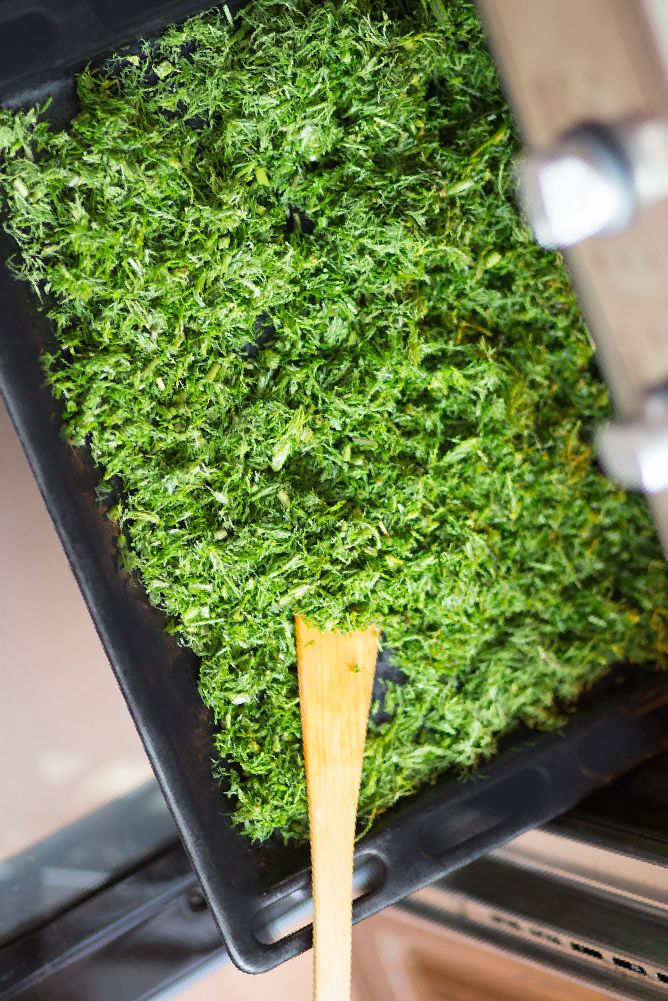
Oven Drying
1. Chop up herb leaves per your usage preference (smaller cuts will dry a bit faster).
2. Place herbs on a shallow cookie sheet.
3. Place herbs in an open oven at 180 degrees F or less for 2-4 hours.
4. Check on the herbs periodically. When they are fully dried, they will crumble easily.
Once dried, store the herbs in air-tight containers like jars, plastic storage containers, or plastic bags. Label and date the container for easy usage. Dried herbs will maintain their flavor for a full year.
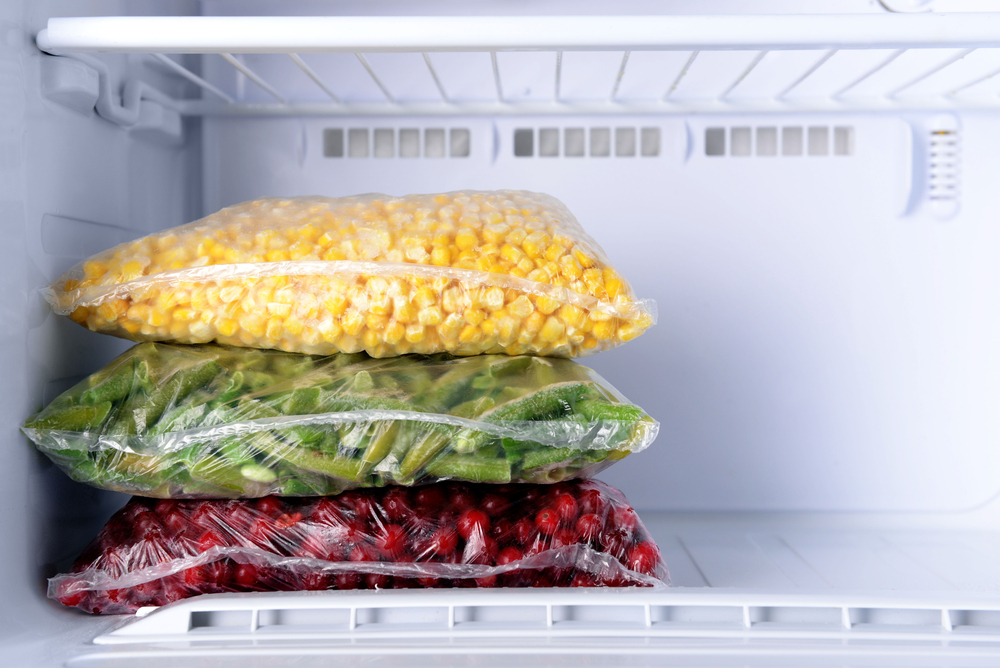
2. Freezing Vegetables
Freezing vegetables is one of the most effective ways of preserving the fullest possible flavor from your produce. Think of it almost like freezing your produce in time. Though you could throw your produce straight into a plastic bag and toss it in the freezer, they won't come out quite the same that way. To get your vegetables properly prepared for freezing, we're going to teach you how to blanch them.
Blanching is a quick method of partially cooking vegetables and then rapidly transitioning them into freezing. How does this help, you might ask? Water expands when it freezes (think of how the ice cubes in your ice tray are always a little more robust than you remember when you poured the water in), so when you freeze a vegetable (which is mostly made of water), it's cells will expand and burst. The result is a vegetable that is mushy and hasn't quite maintained it's structural integrity. By blanching, you are cooking out some of the water and giving the plant cells a little more breathing room for the freezer.
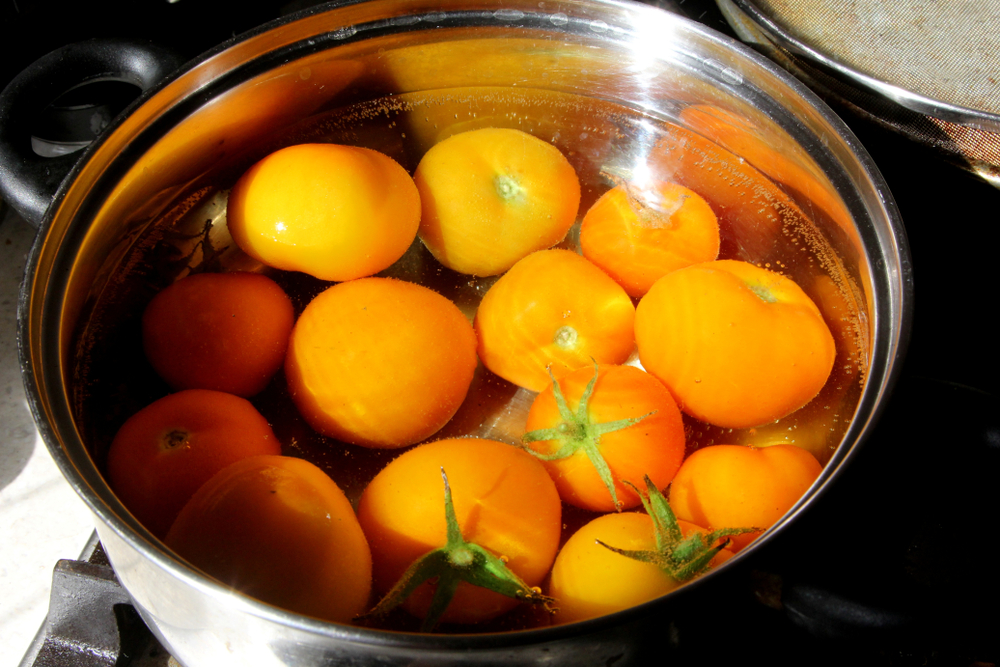
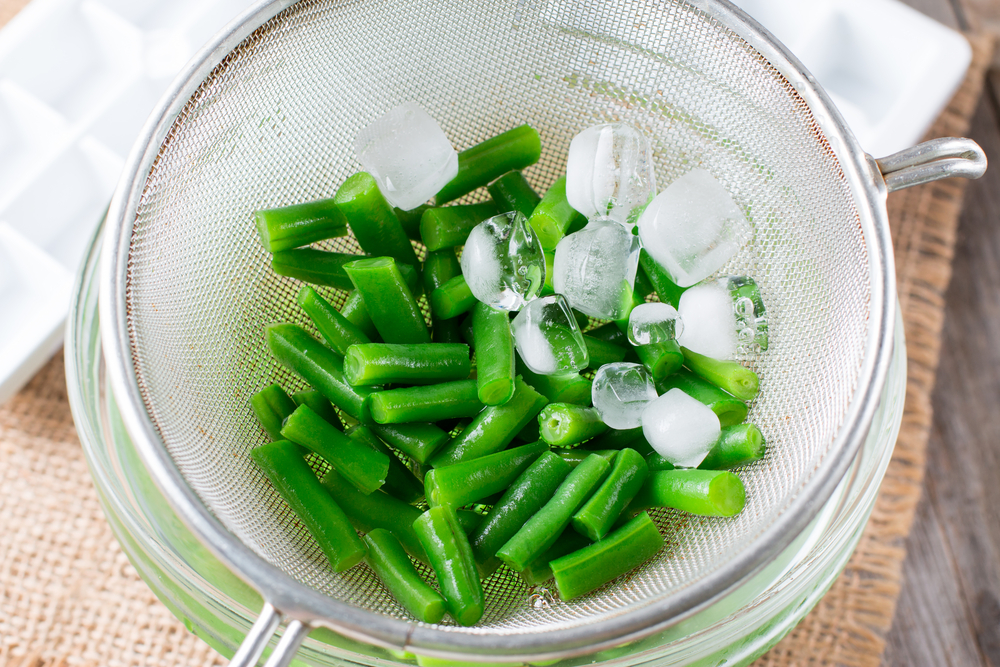
Blanching
1. Prepare a pot of boiling water and in ice bath (ice and water in a large bowl).
2. Add your vegetables to the boiling water and keep the water boiling consistently. Test the tenderness of the vegetables after about 1 minute. Vegetables should be tender, but not mushy.
3. Once the vegetables are tender, quickly remove them from the boiling water and submerge them in the ice bath. This is called "shocking" and it will stop the vegetables from continue to cook.
4. Allow the vegetables to cool completely and then drain them and dry them off by patting them with paper towels.
Freezing
1. Spread out the vegetables on a baking sheet with wax paper and place them in the freezer. This helps prevent them from freezing together in clumps. It is also helpful to have your freezer on it's coldest setting for the first day of freezing.
2. Once frozen, transfer them into zip-seal plastic bags. Remove as much air as possible from the bag before closing. Using a straw to suck out the air can help get more out.
When you're ready to use your frozen vegetables, letting them thaw before cooking will help preserve their cellular structure. To bring vegetables right back to life, you can take them directly from the freezer into boiling water. For more delicate fruits and vegetables, like berries, don't allow them to thaw completely before eating them. They are likely to get a little mushy if left to reach room temperature.
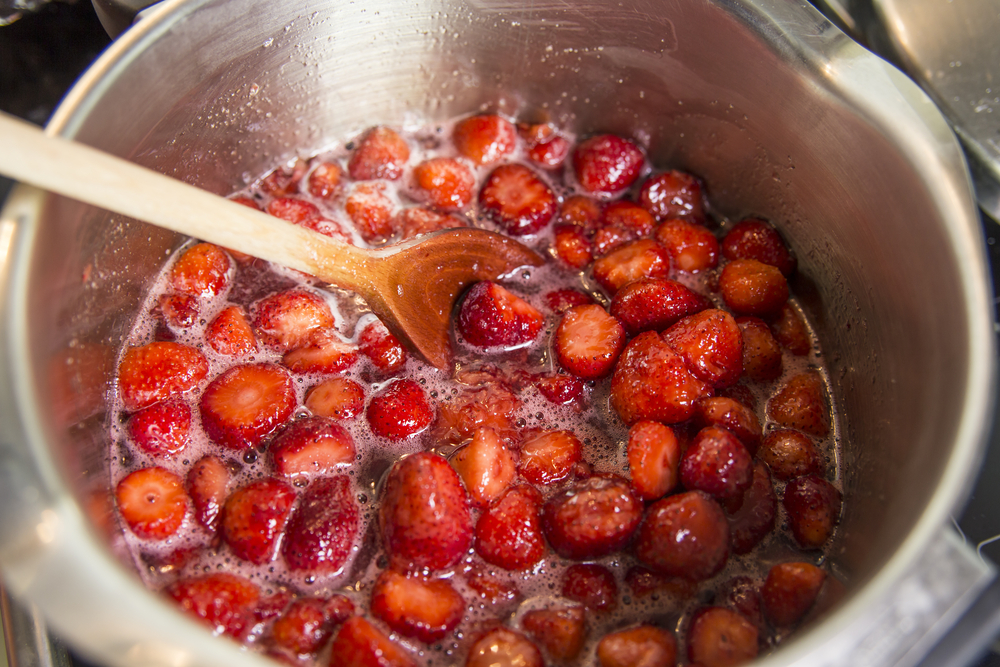
3. Jamming Fruits
Whether you want to call it jam or jelly, we're not going to get into. There are specific distinctions here, but the process we're talking about today is the same, so we're not going to split hairs. Turning fruit into a jam is a simple process that utilizes the sugar, pectin, and acid from the fruit to turn it into the more concentrated, gelatinous form that we know and love: jam.
What you'll need:
- A medium, wide cooking pot
- Heat-proof stirring spoon (ideally wood)
- Small, wide fine-mesh strainer
- Jars with rubber-sealed lids
- Powdered Pectin
- 1/2 Cup Sugar
- 1 Lemon
- 4 Cups Fruit
There are essentially 2 major phases to making a jam: Cooking and Canning.

Cooking
1. Prepare your fruit for cooking by chopping it and tossing it in sugar. Let it sit for at least 30 minutes. This begins the process of maceration.
2. Add the fruit and sugar to the cooking pot and cook on high heat. Squeeze in the lemon and add a piece of the peel to the mixture.
3. Once it begins to bubble, reduce to medium heat and stir consistently (the jam will be susceptible to burning on the stove top).
4. Continue to simmer until the mixture reaches the desired consistency. You should be looking for a syrupy, but still pourable mixture, not firm. Reaching this point may take up to an hour.
5. As the jam simmers, a cloudy foam may form in the mixture and rise to the top. Skim this from the top before taking the jam off of the heat for straining.
6. Using the fine-mesh strainer, pour the mixture through slowly and use a wide spoon to filter the mixture through.
7. Take a small spoonful of jam and set it aside to chill as a test. If it becomes more gelatinous as it cools, then the mixture is ready, but if it remains runny, continue cooking the mixture.
NOTE:
Some fruits have enough natural pectin in them to set into a jam, though if you're having difficulty getting your mixture to thicken up, you can add a pinch or two of powdered pectin while cooking
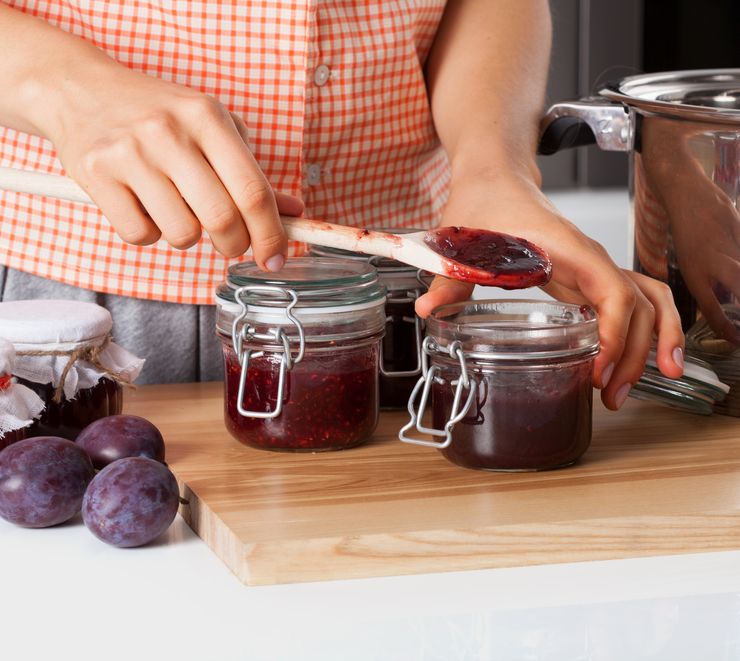
Canning
Before pouring your hot jam mixture into jars, it's important to sterilize the jars. You can simply put the jars through the dishwasher without any detergent, or you can do it the USDA-approved way:
1. Wash jars with warm water and soap and then rinse away suds.
2. Place the jars in a large pot of water, so that the jars are submerged. Bring to a boil and cover, boiling for 15 minutes. (Don't boil the lids as it will distort the rubber).
3. Remove the jars and let the dry on a clean drying rack.
4. Fill the jars with the still-warm jam mixture. Fill the jar very closely to the top to minimize the amount of air inside and then seal the jars.
5. Place the filled jars in a large pot of boiling water, fully submerged for 15 minutes.
6. Remove the jars and let them cool to room temperature before storing them in a cool dry place.
The jam is ready to consume by the time it has fully cooled. You will know that it is finished because the tops of the lids will pop in, assuring you the jar has sealed. Enjoy on toast, waffles, croissants, cheeses, sandwiches, charcuterie, crackers, or any way you can imagine.
4. Pickling Vegetables
Pickles. If you have a pickle craving, you won't just stop at cucumber pickles. Pick up this quick pickling technique and you'll be trying it out on all kinds of produce. We shared our Quick Refrigerator Pickle recipe on a past blog post, including the details for making dill pickles and ideas for other pickled vegetables here. This is the short of it. You'll be surprised at how simple and fast the refrigerator method, giving you fresh pickles overnight. We'll break it down into just 4 steps.
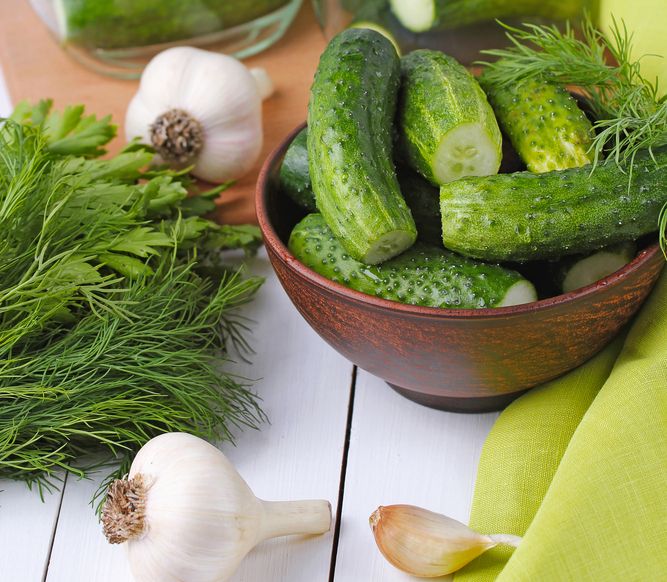
1. Slice and Dice
- Slice cucumbers into thin slices or spears (according to preference)
- Peel, then smash or chop garlic
- Chop dill (medium coarseness)
2. Make the Brine
- Combine water, vinegar salt, garlic, pepper, dill and sugar (optional) in medium bowl
- Stir until sugar and salt have dissolved
- Taste and adjust as needed (according to preference)


3. The Transformation
- Add sliced vegetables to jars
- Pour in brine (If the brine doesn't completely cover the vegetables, don't worry. The salt will pretty quickly extract the extra liquid from the cucumbers)
- Seal up the jars and give them a good shake
- Place jars in the refrigerator
- Shake jars every 2-3 hours for good measure
4. Wait (Not Long)
- After about six hours in the fridge, give or take, the pickles will reach their full saturation and will be ready to eat!
- If they don't seem quite complete, they may take a few extra hours to reach full flavor (this depends on the salt and vinegar content of the brine as well as the thickness of the cucumber)

Keep refrigerated in a well sealed container. Serve on sandwiches, with a charcuterie board or eat them straight out of the jar. Refrigerator pickles aren't a shelf-stable preservation method, but when kept refrigerated, you'll be able to enjoy them for up to 6 weeks.
Want some more ideas about kinds of vegetable to pickle with? Check out or complete recipe here.
5. Food Swaps
Okay, this isn't technically a preservation method, but it is an excellent way to reduce waste from your harvest, build community, and stock up on a variety of produce that you wouldn't otherwise have in your own garden. By swapping the produce you can't make use of with produce that you can make use of, you're making your stockpile more efficient. Food swapping is a simple concept: It can be as small as knocking on your neighbors' doors with a basket of extra veggies, or as large as a community-wide food swap.

A food swap is exactly like it sounds. Local growers meet up with their produce and exchange the things they have in abundance for the things they want from other growers. Growers can barter back and forth until they agree upon exchange rates, like 10 ears of corn for 3 pounds of peaches, or a jar of homemade pickles for a can of jam.
If you want to swap some veggies but you don't know where to look for fellow swappers, you're not alone, there are almost certainly others in your area who are looking to share their garden produce. Take a look at your location on The Food Swap Network to see if there are any food swapping events that already exist in your area or to begin hosting your own swap. All it takes is a little research to find out what's going on near you and then joining in. You may also find food swap groups on Facebook or local community boards.